Show/Hide Map Layers
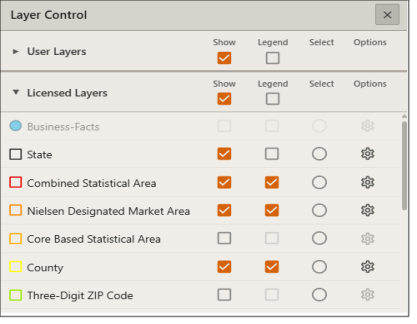
On the Interactive Map main toolbar, click the Layer Control icon ( ). When the Layer Control pop-up window appears, you can do any of the following:
- Display or hide a layer on the map by clicking the Show/Hide check box located to the right of the map layer.
- Include or remove a layer from the legend by clicking the Show/Hide Layer on Legend check box.
- Make a layer selectable by clicking the Select option button. The system automatically sets selectable layers as visible layers on the map.
- Set the layer's label, label style and symbol style via the Layer Options pop-up window, which is accessible by clicking the Options icon (
 ).
). - Reorder the draw order of the layers on the map by dragging and dropping a specific layer the to the desired placement.
Close the pop-up window by clicking the  located in the upper-right corner of the window.
To Learn More:
 View Detailed Steps
- On the Interactive Map main toolbar, click the Layer Control icon (
 ). The Layer Control pop-up window appears.
- Click the Show/Hide check box located to the right of the layer that you want to show on the map.
- Click the Show/Hide Legend check box located next to Show/Hide for the layer that you want to appear in the map legend.
- If you want to make the layer selectable on the map, click the Select option button. The system automatically enables the Show/Hide check box of the selectable layer, making it visible on the map.
- (Optional) To change the draw order of the layers on the map, drag and drop a specific layer to the desired placement.
- (Optional) To zoom to the extent of a specific layer, click the Layer Options icon (), and when the Layer Options pop-up window appears, click the Zoom to Layer Extent. The map automatically zooms in to the extent of your selected layer.
NOTE: You can use the Zoom to Layer Extent function if you used custom data (e.g., a layer of points or a list of ZIP Codes) to create your analysis areas, and you want to zoom in to the extent of your custom data.
- (Optional) To enable the layer label or customize the layer style, click the Layer Options icon (
 ), and when the Layer Options pop-up window appears, do the following:
- Click the drop-down below Set Layer Label, select your desired layer label in the drop-down list, and then click Show Label to display the selected layer label on the map. Click Label Editor to update the layer label's style.
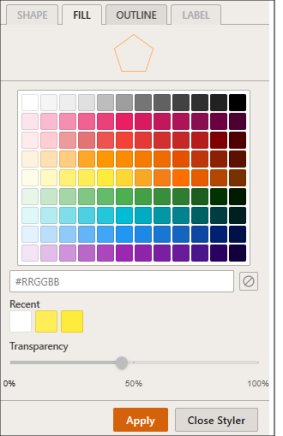
- In Change layer Symbology:, click the Style Editor button, and when the Style Editor pop-up window appears, specify your desired Fill and Outline colors from the color palette. Click and drag the Transparency slider to specify how transparent you want the layer to display on the map, and then click Apply.
- (Optional) If a custom analysis area has been added to the map, the label for the custom area can be added in the Layer Options pop-up window, which is accessible by clicking the Layer Options icon (
 ).
).
- To close the Layer Control pop-up window, click either the located on the upper-right corner of the window.