Effective Buying Income: Select an Analysis Area, the Level of Detail, and the Report Generation Method
On the Step 1 screen, select a geography or an analysis area for which you want to generate a report, the level of detail that you want to include in your report, and the report generation method.
Additional considerations:
- When selecting the analysis areas or standard geographies you want to include in the report, clicking on the folder (without opening it) will select all areas contained within the folder.
- Use the Search function to locate your desired analysis areas.
- Use the Save Selection button to save your selected list of analysis areas for future use.
- Use the Load Selection button to load a previously saved list of analysis areas.
- You can specify to include details about your selected analysis area and/or a map in your report.
After verifying your selections, click Next to proceed.
To Learn More:
NOTE: Depending on your screen resolution or device, some of the options mentioned below may not appear on this screen and you may need to go to the next screen to complete the process. Simply follow the instructions below to set those parameters or refer to the Help provided for the next screen.
- On the Step 1 screen, navigate to and select the geography or analysis area for which you want to generate a report. You can also use the Search function to look for your desired area.
-
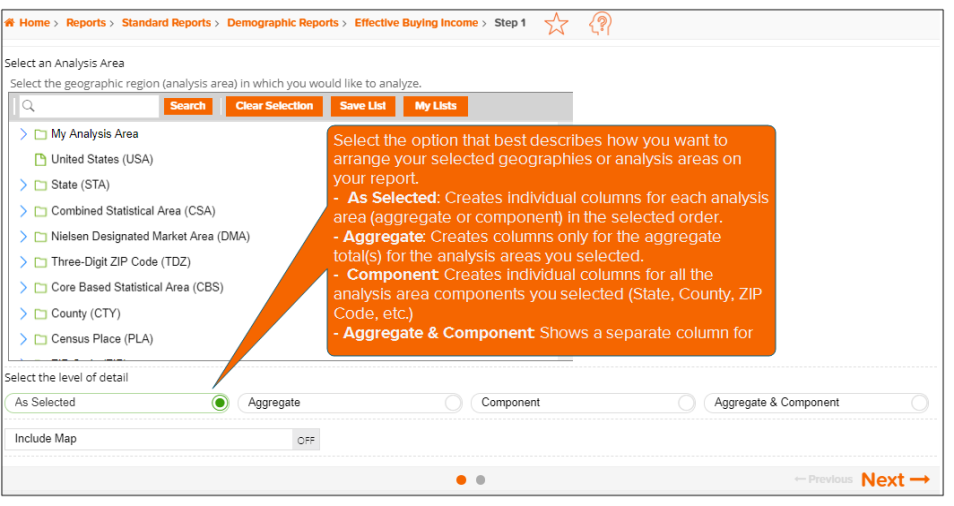
Below Select the level of detail, click the option that best describes how you want to arrange your selected geographies or analysis areas in your report. The options are:
-
As Selected: Creates individual columns for each analysis area (aggregate or component) in the selected order.
-
Aggregate: Creates columns only for the aggregate total(s) for the analysis areas you selected.
-
Component: Creates individual columns for all the analysis area components you selected (State, County, ZIP Code, etc.) If you select this option, you need to select a geography level to use as component and the method by which you want to include the geography.
-
Aggregate & Component: Shows a separate column for the aggregate analysis area followed by columns for each of its components. If you select this option, you need to select a geography level to use as component and the method by which you want to include the geography.
- (Optional) To include a map in your report, do the following:
- Click the OFF button next to Include Map to set it to ON. The Include Labels and Select a color scheme prompts become availabe.
- By default, Include Labels is set to ON. To disable the labels, click the button to set it to OFF.
- In the Select a color scheme drop-down list, select the color theme that you want to use in your map.
- (Optional) To include a map, click the OFF button next to Include Map to set it to ON.
- Click Next to proceed.