Create Analysis Areas Based on an Imported Geography or Polygon File
On the Analysis Area File>Definition screen, click Choose a file and then navigate to and select the file containing the geographies or polygons that you want to import.

When importing polygons, there are certain requirements that must be met:
- The imported file must be given a unique file name, that has not been used for a previously uploaded file.
- The imported file must contain no more than 25,000 polygons.
- The imported file must be a ZIP file consisting of tab, shp or mif files.
- "ID" cannot be used as field name (all uppercase). "ID" field names must be changed to either "Id" or "id" (e.g., Geography Id or Geography id).
- Depending on the type of polygon file being imported, certain file types must be included in the ZIP file:
| Polygon File Type | Mandatory Files | Additional Information |
|---|---|---|
|
ESRI Shapefile (shp) |
|
If extraneous files are available, it is recommended to keep them in the zipped file as they may contain additional information. However, if your import fails, extract the zipped file and re-zip including only the listed mandatory files. |
|
MapInfo Interchange Format (mif) |
|
|
|
MapInfo Table (tab) |
|
If extraneous files are available, keep them in the zipped file as they contain additional information. |
When a preview of the file shows, select and define the columns that you want to import. Columns that need to be specified include: Geography Level, Geography ID, Area ID, Analysis Area Name, and/or Analysis Area Group Name. To import all available column headings, click the OFF button next to Import all columns to set it to ON.
NOTE: If any of the records in the Geography ID column are missing leading zeros, the system will update those records to include the necessary leading zeros.
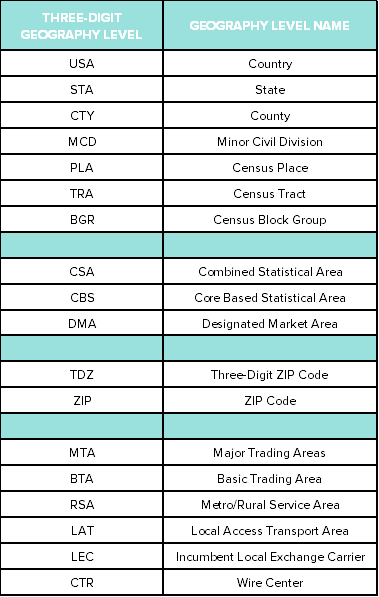
Geography level and the corresponding three-digit geography codes include:
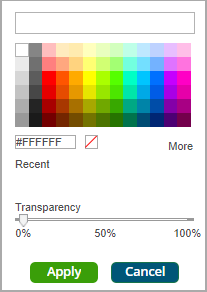
To define how you want the analysis areas to display on the map, click the OFF button next to the Edit the display style of the analysis area to set it to ON. Click the buttons next to Border and/or Fill. When the setting options box appears, click to select your desired color; click and drag the Transparency slider to specify the transparency; and then click Apply.
After verifying your selections, click Submit Job.
When the job is completed, you can do any of the following:
- View the job
- Create a Consumer Concentration or Location Detail report
- View your analysis areas on the interactive map
- Export your analysis areas
- Create another analysis area