Profile Builder: Upload a New Customer File
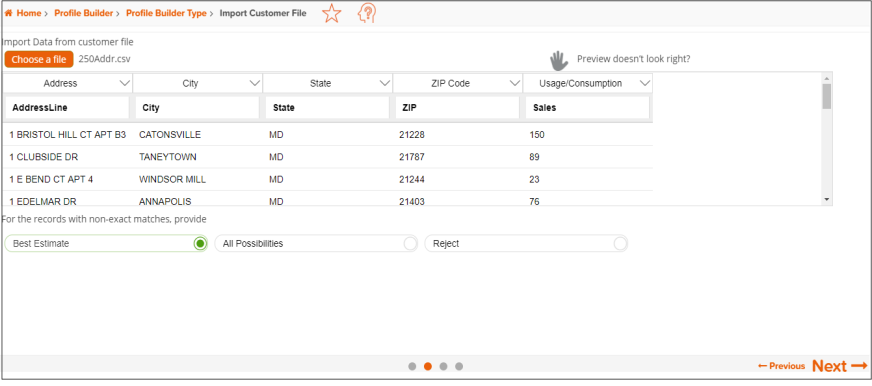
On the Import Customer File screen, click the Choose a file button, navigate to and select the file that you want to upload. When the preview of the file appears, select the appropriate column header for each column in the file and the method to use for non-exact matches.

To Learn More:
- On the Import Customer File screen, click the Choose a file button. Navigate to and select the file that you want to upload. The contents of your selected file appear below.
NOTE: To facilitate file processing, make sure your address file is as cleaned up as possible and only contains U.S. addresses.
- If the file preview does not display correctly, click
 and when additional options for updating your file preview appear, specify whether or not the first line of your file is a header by clicking the OFF button, select the field delimiter used in your file, click Update Preview.
If the file preview appears correctly, do the following:- Verify all column headings. You can select the columns that you want to import and assign appropriate column headings by clicking the drop-down arrow next to the topmost column heading.
(Optional) If your file contains consumption data, identify that column as Usage/Consumption.
To sort, remove/add columns, and group the columns in your selected file prior to uploading it, hover and click the drop-down arrow next to the column headings of the previewed files and select the appropriate option for your desired action.

- Select one of the following methods for fixing non-exact matches:
- Best Estimate: The system determines the best match for each address entered and appends the information.
- All Possibilities: If an exact match cannot be found, all possible matches are considered.
- Reject: Non-exact matches are not appended with geographic and segmentation codes; however, the locations remain in the list but are not used for subsequent reporting and calculations.
- Verify all column headings. You can select the columns that you want to import and assign appropriate column headings by clicking the drop-down arrow next to the topmost column heading.
- Click Next to proceed.