Custom Data Manager
Custom Data Manager allows you to upload and register a file with its associated metadata into Claritas 360.
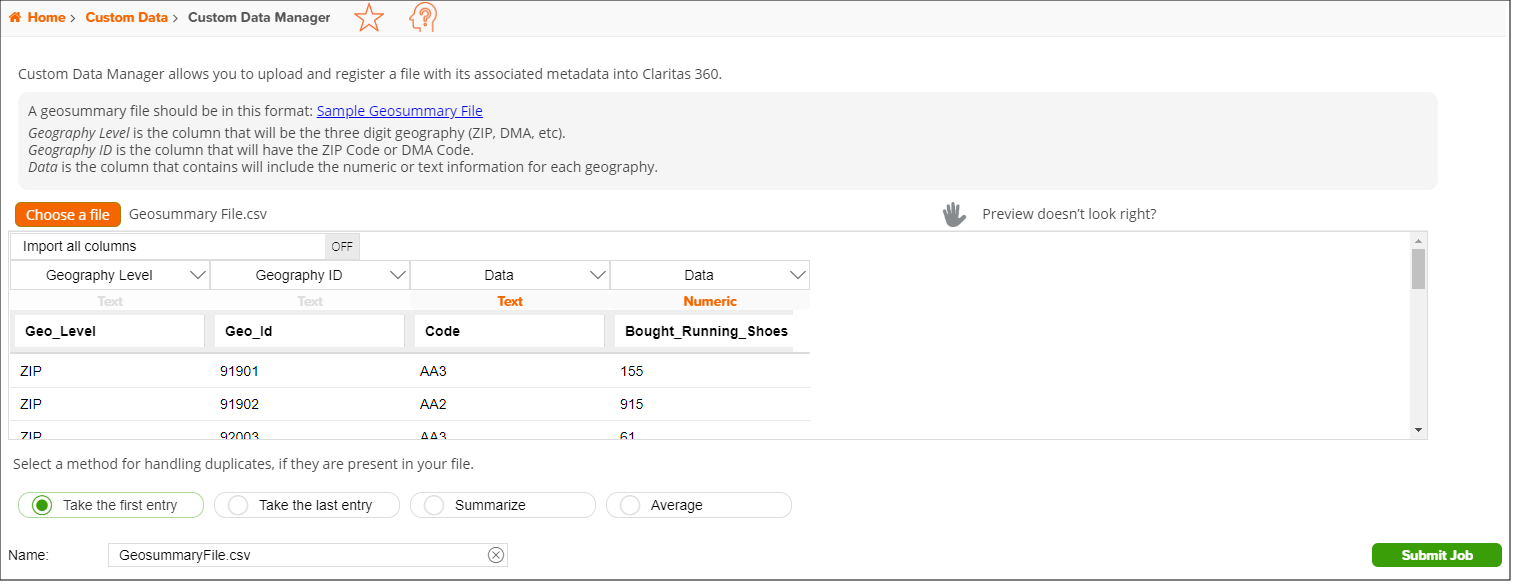
On the Custom Data Manager screen, choose the file you want to upload, identify the appropriate column headers, specify the method for handling duplicate records, and name the file. After you verify your selections, click Submit Job.

To Learn More:
- On the Custom Data Manager screen, click Choose a file and then select the file that you want to upload. The contents of your selected file appear below.
- (Optional) If the file preview does not display correctly, click
 and when additional options for updating your file preview appear, specify whether or not the first line of your file is a header by clicking the OFF button, select the field delimiter used in your file, click Update Preview.
 - Verify all column headings. You can select the columns that you want to import and assign appropriate column headings by clicking the drop-down arrow next to the topmost column heading.
Additionally, ensure data columns are correctly labeled as Text or Numeric. Click on the orange text if you need to update the data column type.
To import all available column headings, click the OFF button next to Import all columns to set it to ON.
The columns that need to be identified are:
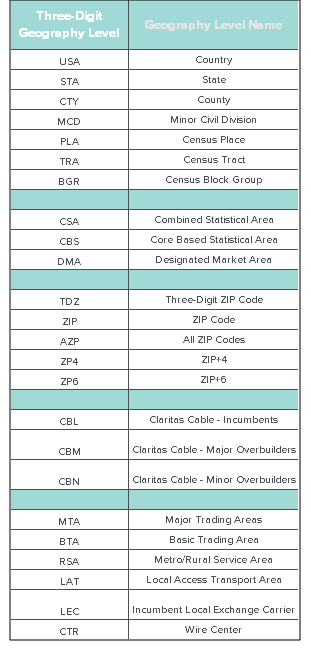
- Geography Level is the column that contains the three-digit geography level. The geography levels include:

- Geography ID is the column that contains the geographic codes.
NOTE: If any of the records in the Geography ID column are missing leading zeros, the system will update those records to include the necessary leading zeros.
- Data is the column that contains the information for each geography.
- If your imported file contains duplicate geography codes, select a method for how you want the system to handle the duplicates. You can select to accept the first entry; the last entry; a sum of the counts; or an average of the counts.
- (Optional) Update your file name in the Name field. Click Submit Job. When the job is completed, you can view the job and the output file. The output file is also saved to your My Content.