Create a Filter
On the Filter screen, specify the data type, element(s) and operator(s) to include in the filter that you want to use to create your Business List, and then save the filter for future use.
After verifying your selections, click Next to proceed.

To Learn More:
Business List Report, Using a Filter Walkthrough
- Select a syndicated data source to use for creating the filter.
- Click the category of elements or data type that you want to use to create your filter conditions. The options are:
- My Filter - To select from previously created and saved filters.
- Data Fields - To select from the available standard business data variables.
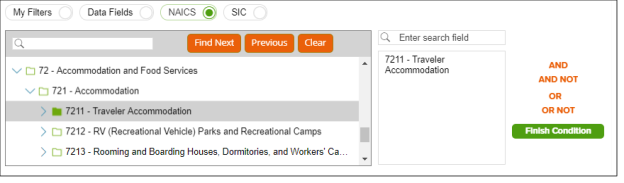
- NAICS - To include North American Industry Classification System (NAICS) codes, the standard used by Federal statistical agencies in classifying business establishments for the purpose of collecting, analyzing, and publishing statistical data related to the U.S. business economy.
- SIC - To include Standard Industrial Classification (SIC) codes, a system used by government agencies to classify industry areas.
- Franchise Code - To include Franchising Code of Conduct codes, a mandatory industry code that applies to the parties to a franchise agreement.
The related data category folders and elements appear in the box below.
- Expand the selected folder to navigate to and select the data element that you want to use. Your selection appears in the box located to the right.
- (Optional) If you select to use Data Fields to create your filter conditions, additional text boxes appear. Select an appropriate operator from the drop-down list.

If you did not select Data Fields to create your filter conditions, proceed to the next step.
- (Optional) To add to your filter condition, click one of the following operators:
- AND - To add another condition.
- AND NOT - To specify a condition that must not be met.
- OR - To specify an alternative condition.
- OR NOT - To specify an alternative condition that must not be met.
The created condition appears next to the Filter Condition field.
-
(Optional) To add conditions, repeat Steps 3 through 5.
-
Click Finish Condition to indicate that you have completed setting your filter conditions. A count of records that meet your created condition appears in the Precount text box.
-
(Optional) If you need to update your filter, click
 next to the condition that you want to update, make the necessary changes, and then click Update Condition.
If you want to delete a condition, click next to the condition that you want to remove.
NOTE: The Update Condition option becomes available only if you click the ![]() icon to edit your conditions.
icon to edit your conditions.
- In the Name text box, type a name for your filter.
- (Optional) Click Save Filter located at the bottom of the screen. The system saves your created filter.
NOTE: If you select an existing filter from My Filters, the Save Copy of Filter As option becomes available. Click this button to save a copy of the filter. By default, the system saves the copy to My Filters using the same file name, but adds "Copy" to the end file name.
- (Optional) To create another filter, click Create New and then repeat Steps 1 through 10.
- Click Next to proceed.
What's Next:
If you are generating a Business List report, go to Generate a List Output.
If you are creating an analysis area from Claritas Business-Facts, go to Create an Analysis Area Around a Location.