Location Builder: Upload a New File
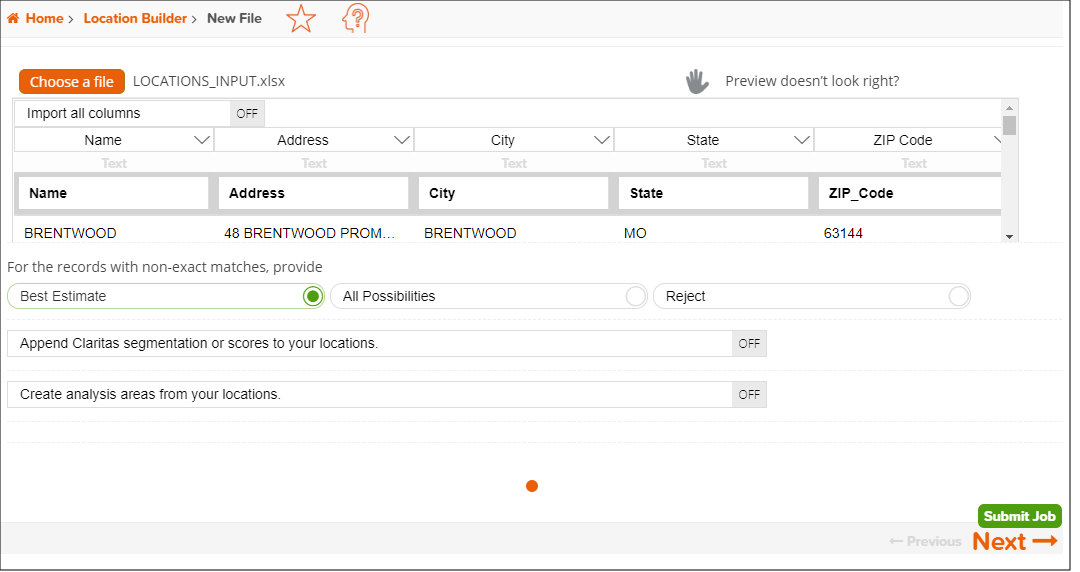
On the New File screen, select the location/address file that you want to upload. When a preview of the selected file appears on the screen, verify each column heading. You can change the column headings and select the columns that you want to import by clicking the drop-down arrow next to the topmost column heading. To import all available column headings, click the OFF button next to Import all columns to set it to ON.
(Optional) After selecting the columns to import, you can do any of the following:
- Append segmentation or scores to the locations
- Create analysis areas around the locations
After verifying your selections, click Next.
If you do not want to do any of the optional actions mentioned above, click Submit Job. Once the output has been generated, you can view the job and the output file. The output file is also saved to your My Content.
NOTE: You can review the User Selections pane located to the right of the screen and make sure that it shows your current selections.

To Learn More:
- On the New File screen, click Choose a file and then select the file that you want to upload. The contents of your selected file appear below. Proceed to the next step.
- If the file preview does not display correctly, click
 and when additional options for updating your file preview appear, specify whether or not the first line of your file is a header by clicking the OFF button, select the field delimiter used in your file, click Update Preview.
If the file preview appears correctly, do the following:- Verify all column headings. You can select the columns that you want to import and assign appropriate column headings by clicking the drop-down arrow next to the topmost column heading.
To import all available column headings, click the OFF button next to Import all columns to set it to ON.
To sort, remove/add columns, and group the columns in your selected file prior to uploading it, hover and click the drop-down arrow next to the column headings of the previewed files and select the appropriate option for your desired action.
- Select one of the following methods for fixing non-exact matches:
- Best Estimate: The system determines the best match for each address entered and appends the information.
- All Possibilities: If an exact match cannot be found, all possible matches are considered.
- Reject: Non-exact matches are not appended with geographic and segmentation codes; however, the locations remain in the list but are not used for subsequent reporting and calculations.
- Verify all column headings. You can select the columns that you want to import and assign appropriate column headings by clicking the drop-down arrow next to the topmost column heading.
- (Optional) To append segmentation or scores to your locations, click the OFF button next to Append Claritas segmentation or scores to your locations to set it to ON.
- (Optional) To create analysis areas around your locations, click the OFF button next to Create analysis areas from your locations to set it to ON.
- If you selected to do additional actions prior to uploading your file, click NEXT.
If you did not select any of the additional actions, click Submit Job. When the job is completed, you can view the job and the output file. The output file is also saved to your My Content.
What's Next:
If you want to append Claritas segmentation or scores, go to Location Builder: Append Claritas Segmentation Data.
If you want to create analysis areas for the file that you uploaded, go to Create an Analysis Area Around a Location.
If you clicked Submit Job, go to View the Output File.