Create an Analysis Area Around a Location
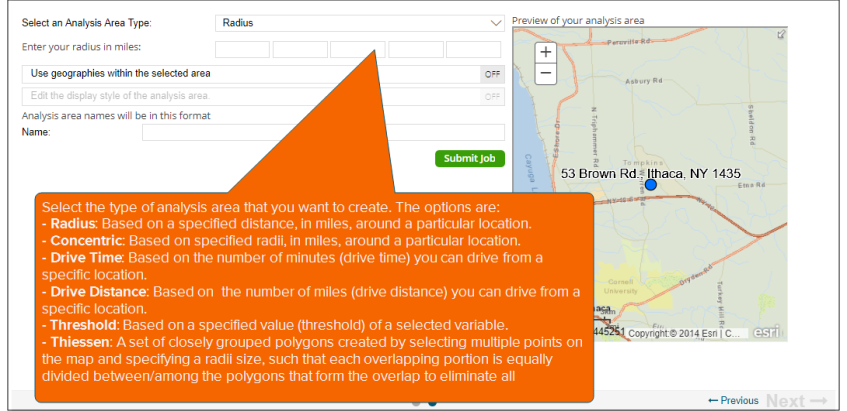
On the screen similar to the one shown below, specify the analysis area type and settings that you want to use, and then click Submit Job. You may also specify to use the geographies within your selected area and/or customize the area display on the map.
NOTE: You can review the User Selections pane located to the right of the screen and make sure it shows your current selections.
The title that appears on top of this screen may vary depending on the module (e.g., Analysis Area Builder, Profile Builder, Location Builder) that you are using.
To Learn More:
To Learn More:
Analysis Areas, Using Locations
-
On the screen similar to the one shown above, in the Select an Analysis Area Type drop-down list, select the type of analysis area that you want to create. The options are:
- Radius: Based on a specified distance, in miles, around a particular location.
- Concentric: Based on specified radii, in miles, around a particular location.
- Drive Time: Based on the number of minutes (drive time) you can drive from a specific location.
- Drive Distance: Based on the number of miles (drive distance) you can drive from a specific location.
- Threshold: Based on a specified value (threshold) of a selected variable (for example, an area based on the current-year population threshold of 10,000).
- Thiessen: A set of closely grouped polygons created by selecting multiple points on the map and specifying a radii size, such that each overlapping portion is equally divided between/among the polygons that form the overlap to eliminate all overlapping portions.
- If you are creating a radius analysis area, in the Enter your radius in miles text box, type the number that corresponds to the radius (in miles) that you want to create around your specified location data.
If you are creating concentric radii analysis areas, type the radius of the inner circle that you want to create around your specified location data in the Inner Radius text box, and then type the radius of the outer circle in the Outer Radius text box. Radius unit is in miles.
If you are creating a drive-time analysis area, in the Enter drive time in minutes text box, type the travel time (in minutes) from your specified location data, that you want to use as basis for creating your analysis area.
If you are creating a drive-distance analysis area, in the Enter drive distance in miles text box, type the travel distance (in miles) from your specified location data, that you want to use as the basis for creating your analysis area.
If you are creating a threshold analysis area, specify the variable that will be used for the threshold, the maximum threshold value in the Threshold Value text box, the percent tolerance (i.e., the inaccuracy rate is used to determine how close the resulting radii are to the specified threshold value) in the Tolerance in % text box, your preferred maximum number of iterations in the Maximum # of Iterations text box, and the minimum and maximum radius in miles in the appropriate radii text boxes.
If you are creating a Thiessen analysis area, specify the number of polygons that you want to create and then the size of each radius, in miles.
If you are creating an amoeba analysis area, specify whether you want to create your amoeba analysis area based on percentage or maximum number of customers; specify your desired percentage or maximum value for inclusion; specify your desired maximum distance for the area (in miles); and enable or disable the smoothing feature. After you specified all required settings, proceed to Step 4.
- (Optional) To create your analysis area based on standard geographies that fall within your selected area, perform the following steps:
- Click the OFF button next to Use geographies within the selected area to set it to ON. Additional options appear.
- In the Select a geography level drop-down list, select your desired geography level.
- Specify the method by which you want to include the geography. The options are:
- Centroid inclusion: Includes geographies with centroids that fall within the perimeter of the area.
- Entirely within: Includes geographies that fall completely within the perimeter of the area.
- Within or touches: Includes geographies that fall within or touch any part of the perimeter of the area.
- By default, the interior boundaries will be shown on the map. To hide the interior boundaries, click the ON button next to the Show interior boundaries? text to set it to OFF.
- (Optional) To define how you want the analysis areas to display on the map, perform the following steps:
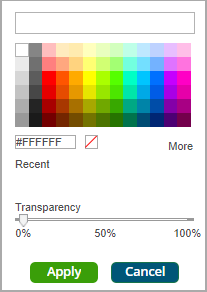
- Click the OFF button next to Edit the display style of the analysis area to set it to ON. Border and Fill buttons appear.
- To customize the analysis area border settings, click the button next to Border. When the Border setting options box appears, click to select your desired border color; click and drag the Transparency slider to specify the transparency of the border; and then click Apply.
- To customize the analysis area fill settings, click the button next to Fill. When the Fill setting options box appears, click to select your desired border color; click and drag the Transparency slider to specify the transparency of your analysis area display; and then click Apply.
- In the Name text box, the naming convention for your analysis area(s) will be displayed.
- If you are creating analysis areas via Analysis Area Builder, click Submit Job. When a message box appears specifying that your analysis area has been saved, click OK.
When the job is completed, you can do any of the following:
- View the job
- Create a Consumer Concentration or Location Detail report
- View your analysis areas on the interactive map
- Export your analysis areas
- Create another analysis area
If you are creating analysis areas for an imported location file via Location Builder, click Submit Job. When the job is completed, you can view the job and the output file. The output file is also saved to your My Content.
What's Next:
If you are creating analysis areas via Analysis Area Builder, you have completed the analysis area creation process. You can access your saved analysis area in My Content.
If you are using Location Builder go to View the Output File.
If you are using Profile Builder and you are creating analysis areas to define your profile base, go to Profile Builder: Save the Geosummary and Name the Profile.