Target Builder: Create a Target Group Using the Chart View
NOTE: Perform this procedure only if you are using a Claritas segmentation system as your source to create your target groups and are defining the segments by using profiles.
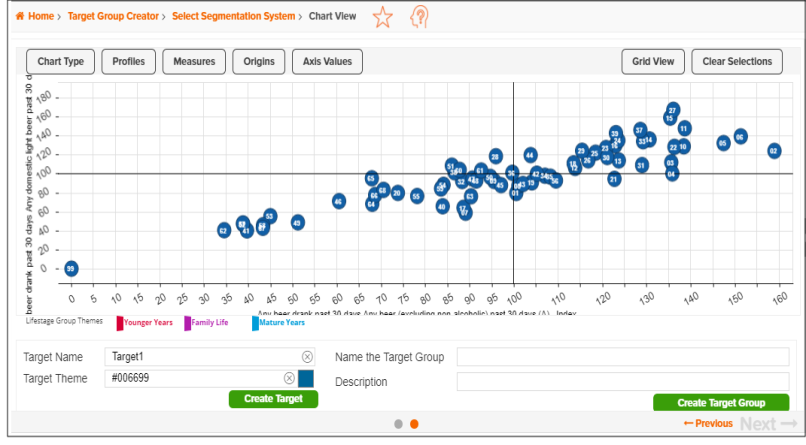
On the Chart View screen, if you selected more than one profile to define the segments, make sure that the displayed segment data is for the profile for which you want to create a target by clicking Profiles. The highlighted profile is the profile used for the displayed data.
(Optional) You can change the measures, the origins for the grid lines, and the minimum/maximum values displayed on the chart.
Using the default chart view (i.e., the Game Plan), including the measures, origins, and values used on the chart, draw a circle around the segment(s) that you want to include in your target. After selecting your desired segments, type a name for your target and then click Create Target. You can create additional targets to include in your group by repeating the steps above.
After creating your targets, name your target group, add a description, and then click Create Target Group.
When the job has been submitted and a message box appears specifying that your target groups have been successfully created, click OK to close the message box. You can view the target group generation status on the My Jobs screen. The generated target groups are also saved to your My Content.

To Learn More:
Create Target Groups Using Charts Walkthrough
Create Target Groups Using Filters Walkthrough
Create Target Groups Using Previously Defined Targets Walkthrough
- (Optional) If you selected several profiles to define the segments in your selected segmentation system, the Grid View button shows on the Chart View screen, and the SWOT chart view is displayed by default. To switch to the Game Plan chart, click Chart Type and then select Game Plan in the drop-down list. The system switches to the Game Plan chart view.
If you selected only one profile to define the segments in your selected segmentation system, the Chart Type button is unavailable, and the system displays only the Game Plan chart. - (Optional) If you selected several profiles to define the segments in your selected segmentation system, the system displays the segment data for the first profile that you selected. To view the segment data for another profile, click Profiles and then click your desired profile in the drop-down list. The appropriate segment data for the selected profile displays on the chart.
- (Optional) By default, the measures shown on the chart are Index (x-axis) and Behavior %Comp (y-axis). To change the measures, click Measures and then select the desired measure for each axis. The options are:
- Index: Shows the likelihood that a household uses the product (based on an average index of 100).
- Users/100 HHS: Shows the number of households/adults that use the product (Count) compared to all households in the segment (Base Count).
- Base %Comp: Shows the proportion of segment households compared to the total number of households.
- Behavior %Comp: Shows the percentage of households/adults using the product profile compared to the total number of all households using the product.
- (Optional) To change the default axis values where the grid lines display, click Origins and then type your desired value for each axis.
- (Optional) To change the default minimum and maximum values displayed for the axes, click Axis Values and then type your desired minimum and maximum values for each axis.
- To create a target, do the following:
- Draw a circle around the segment(s) that you want to include in your target.
NOTE: You can include one or more segments in your circle or draw a circle around each segment.
- In the Target Name text box, type a name for your target.
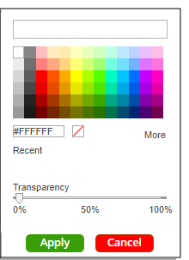
- By default, the system assigns a target theme. To change the default theme, click the colored box to the right of Target Theme. When a color palette appears, select your desired color and drag the Transparency slider to set your desired transparency settings.

- Review your settings and then click Create Target.
- To create additional targets, repeat Steps 1 through 6.
- After you have created all your desired targets, in the Name the Target Group text box, type a name for your target group.
- (Optional) In the Description text box, type a short description about your target group.
- Review your settings and then click Create Target Group. A message box appears specifying that your target groups have been successfully created.
- Click OK to close the message box. The Use My Target Group screen appears showing you the following tiles or options to select from:
- Target Builder - Returns you to the Target Builder module to create another target group
- Target Segment Measures - Allows you to generate a Target Segment Measures report using your created target group(s)
- Target Concentration - Allows you to generate a Target Concentration report using your created target group(s)
- Dominant Target - Allows you to generate a Dominant Target report using your created target group(s)
- Home - Returns you to the Home screen
What's Next:
View the Job Status/Output File